


Fall 2021
The roots in my garden grow far into the winter, and fall planting is great for my plants.
I plant new container plants just before the rains begin around November. This allows their roots to grow during much of the winter and to become well established by spring. This fall planting is crucial for gardening in a summer-drought area. Because I plant the right drought-resistant plants and mulch them in the fall, I’ve never had to irrigate my garden in over 30 years. (I also mulch the daylights out of them every spring.)

If I do plant in the spring, I have to irrigate the trees for one or more years before their roots adapt to the dry summers. (I use household greywater from my shower.) Nonetheless, each spring I save money by buying bareroot trees. I usually buy fruit trees this way, but bareroot nursery stock often includes ornamental trees. A bareroot tree can save you a lot of money, generally costing about 50 percent less than a potted equivalent.
Magnificent Mounds
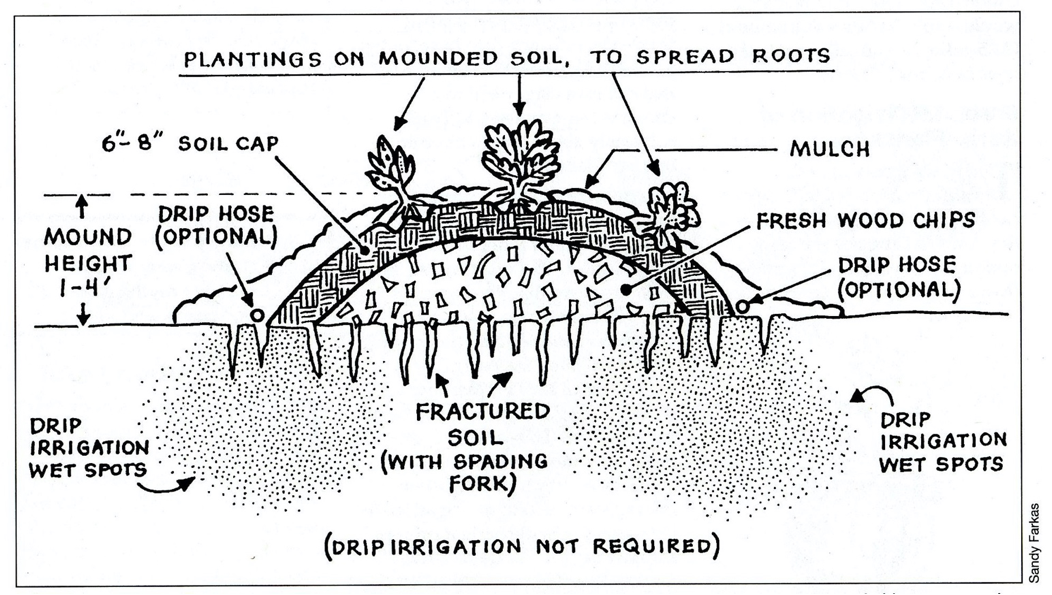
The entry path to my front door used to be a swampy spot during heavy winter rains. To reroute the surface runoff without complicated drainage piping, I started by forming a mounded planting area along each side of the path and digging a shallow creeklet—also known as a swale—on the wettest side.
This was originally an experiment in no-till gardening, an attempt to learn more ways to improve soil and drainage. In the process, however, I discovered that you can just heap piles of all kinds of agricultural and garden “wastes,” and grow beautiful ornamentals.
To begin these mounds, I piled horse-stable sweepings (mostly manure and straw) and turkey bedding (rice hulls with some sand and turkey poop) about 18 inches high and over three feet wide, and watered the entire mound thoroughly. Where each plant was to be placed, I made a large pocket of good mellow soil to receive the roots. After planting, I watered everything again, then covered the mounds with 5–10 sheets of newspaper topped with four or more inches of composted, weed-free turkey bedding. This mounding approach is really like building and planting directly on top of a very wide and shallow active compost pile.
The pathway plants flourished, with the mullein (Verbascum spp.) and foxglove (Digitalis purpurea) flower stalks reaching 6–9 feet tall. But for the first two years, to my amazement, the mounds required more summer irrigation than conventional soil-based beds, probably because of the lack of clay to retain moisture. My drainage problem was solved, but I wanted to eliminate the need for extra summer watering. This was just before I figured out how to grow my garden without irrigation.

Heaping piles of garden waste will allow you to grow beautiful ornamentals and vegetables. This mounding approach is like building a very large, low-heat compost pile where you plant directly into a safe, neutral cap of topsoil. Mounds are also much like great heaps of sheet compost—thin layers of compostable materials, not a compost pile. Looking at the mound from my entry pathway, I can see my research plot along the creeklet (the berm and swale system) I made just west of my first no-till mounds.
Back in the early ’90s, I used fresh, chunky woodchips mixed with green leaves and twigs from local tree-trimming services. The best woodchips are hardwoods. I avoid any shredded material that might easily resprout—willows, acacias, alders, or various vines. I also avoid plants whose foliage stunts or kills the growth of other plants that try to grow nearby: black walnut (Juglans nigra) and sagebrush (Artemisia californica). Other places should watch out for mesquite (Prosopis glandulosa ssp. torreyana).
If I can’t get a fresh load of green chippings, I get mixed sizes of woody chips. Because the chips are so high in carbon, layer or mix the chips with some manure. I start the mound with the largest, chunkiest pieces to keep the bottom of the pile from settling too much. For all the subsequent layers, I use a blend of smaller chips, 0.5 to 6 inches long, and any fresh grass clippings; green-manure crops such as buckwheat, vetch, bell beans, and clover; wet kitchen garbage or scraps; and green weeds from the garden. I’ve experimented with a ratio of four parts green matter to one part wood chips. The more nitrogen (green material, manure, or fertilizer) I add, the faster the mound will decompose, and the greater the nitrogen supply for the growing plants. I pile this mixture of high-carbon and high-nitrogen materials at least a third higher than I want my final soil level. Depending upon the types of materials used, the mound may settle as much as 30–50 percent.
I make a soil cap at least four inches thick—the thicker, the better. (Again, a one-time use of digging.) I try to find the soil next to the mound—usually curved like a small, serpentine stream bed—so that as I add soil to the top of the mound, the swale (drainage area) gets deeper at the same time. This doubles the depth of the swale as the mound is built—for better drainage during heavier rains. Use native soil gathered from around the garden for good drainage, a normal soil temperature, and good initial growth.
The whole combination acts like a compost pile. The plant’s root hairs will follow right behind the warm decomposition and won’t grow into areas that are too hot due to composting activity. The plants get some benefit from the heat the mound generates, much like bottom-heated greenhouse flats.

Eventually, within four or five years, my research mound’s chips decomposed, the soil settled to a lower level (less than 12 inches high), the shrubs rooted fully into the native soil, and the new mound became a wonderful, curvilinear feature alongside the new little creeklet. Mounded plantings, which seemed to me to be a heap of contradiction at first, have become one of my preferred techniques for quick soil development. They are also a cheap way to create “instant” soil drainage, an aesthetically pleasing way to create a gently meandering topography, and a great way to establish a truly drought-resistant landscape.
I use the mounds to plant perennials, herbs, subshrubs like lavender, other shrubs, and trees. Eventually the whole mound settles to a lower level, the chips fully decompose, the shrubs root into the native soil, and it can be a wonderful, curvilinear feature in the landscape. Mounded plantings then just need a seasonal weeding and perhaps an occasional application of newspaper with layered, weed-free mulch.


Design Futurist Award Announced: Committee Shares Vision
March 8, 2023 At Pacific Horticulture, we believe that beauty can be defined not only by gorgeous plants and design, but also by how gardens
Expand Your Palette: Waterwise Plants for your Landscape
There’s nothing more thrilling to plant lovers than discovering new plants to test in the garden. Here in the southernmost corner of California, we have
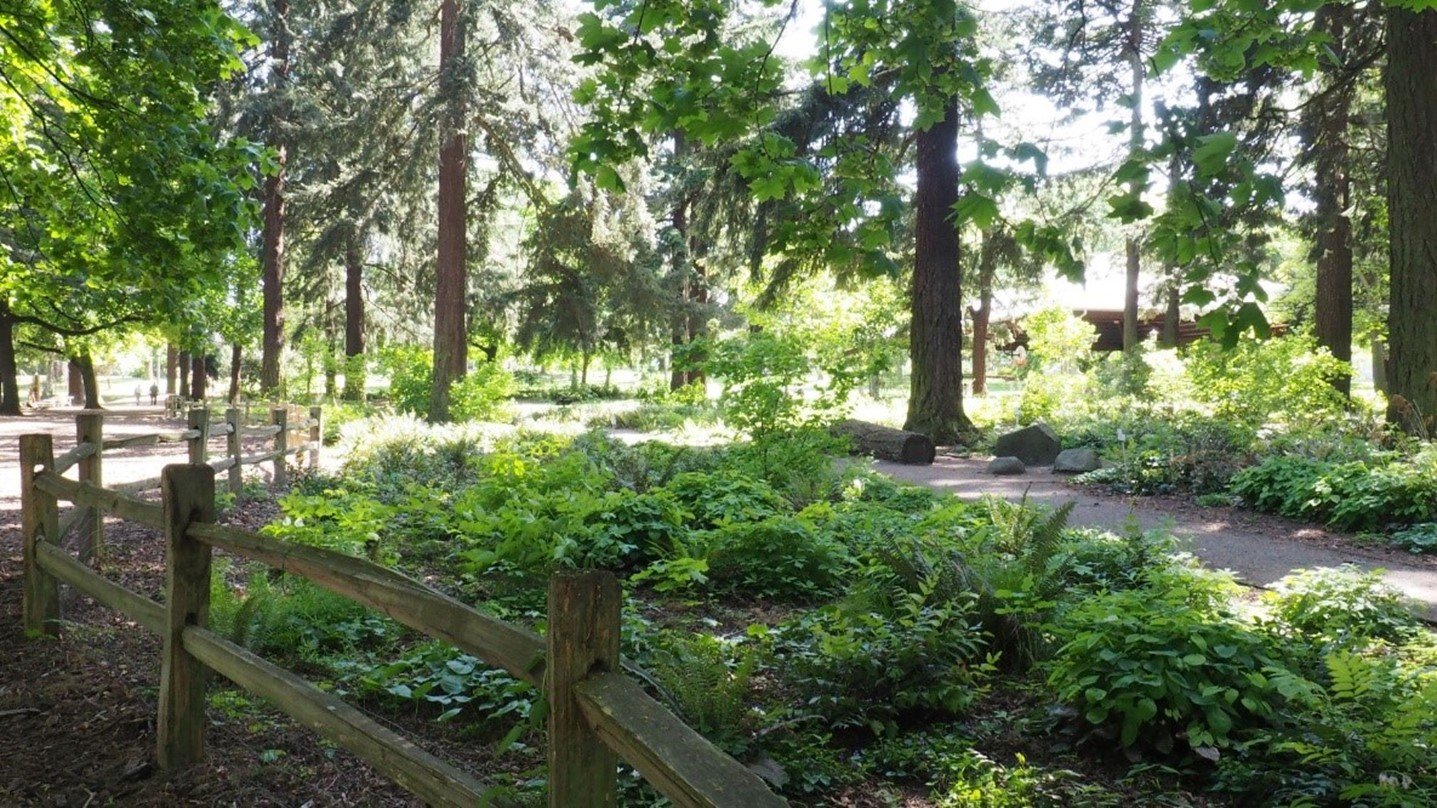
Portland Parks’ “Nature Patches”
Winter 2022 Nature is so beautiful when left to its own devices, yet crisply manicured lawns remain a status symbol. This is true in Portland,
Readily Available Low-Water Plants for a Warming Climate
Fall 2022 Al Shay is the manager of the Oak Creek Center for Urban Horticulture on the campus of Oregon State University (OSU) in Corvallis.
Responses